Monday, April 29, 2013

VIDEO - 2013 Leader 725 is Sure To Impress!


The 2013 LEADER 725 in complete form includes high-end leader components and allows the rider to choose Fixed Gear or Freewheel for added versatility and is geared towards riders of all levels.


It;s got a new design and new color schemes: black matte, white gloss, seafoam green, auto grey flat, auto silver, pearlescent purple and corsa red. It's the same Leader track frame that came in seafoam green, black, and white, with the same performance, stiffness, and acceleration that we all expect from Leader Bikes but with cleaner welds and even stiffer technology.


Come to Bumsteads for all your bike maintenance needs.
We are located at 1038 W. 4th St. in Ontario, CA. You can reach us by phone at (909) 984-9067

Friday, April 26, 2013

25 Common Cycling Problems, And How To Fix Them

Got a Pinch Flat? Creaky Crankset? A Loud Noise You Can't Explain? We Have The Solutions.


You fixed a puncture, and the new tube keeps going flat


If the holes in the tube are in the bottom, the rim strip may be out of position, allowing the tube to get cut by the spokes. If they're on top, there may be some small sharp object stuck in the tire. Find it by running your fingers lightly around the inside of the tire, then remove it.


A remounted tire won't sit right on the rim

Let the air out, wiggle the bad spot around, reinflate to about 30 psi, and roll the bad spot into place with your hands. By pushing the tire in toward the middle of the rim you will be able to see if any of the tube is poking out. When the tube is fully inside the tire, inflate as normal.


A patch won't stick to the glue on the tube

Apply more glue and let it dry completely, about five minutes (DO NOT BLOW ON THE GLUE) When you apply the patch, avoid touching its sticky side with your fingers.

A creaking sound from the wheels

A spoke may have loosened. If tension is uniform, the sound might be caused by a slight motion of the spokes against each other where they cross. Lightly lube this junction, wiping off the excess.

A creaking sound when you pedal

Tighten the crankarm bolts. If the arm still creaks, remove it, apply a trace of grease to the spindle, and reinstall the arm.

The large chainring flexes, and the chain rubs against the front derailleur cage.


Check for loose chainring bolts

You have removed the chainrings to clean the crankset, but now the front derailleur doesn't shift right. 

You may have installed a chainring backward. Remove the rings and put them on correctly. Usually, the crankarm bolts fit into indentations on the chainrings. Sight from above too, to make sure there's even spacing between the rings.


While trying to remove or adjust a crankarm you stripped the threads- Now you can't remove it

Ride your bike around the block a few times. The crankarm will loosen and you'll be able to pull it off.

Shifter housing rubs the frame, wearing a spot in the frame

Put clear tape beneath the housings where they rub.

Noisy sloppy shifting can't be remedied by rear derailleur adjustment

The cassette lockring might be loose, allowing the cogs to move slightly and rattle around on the hub. You need a special tool to tighten the lockring fully, but you can spin it tight enough with your fingers to ride safely home or to a stop.


The cog cassette is getting rusty

A little rust won't damage the cogs quickly, so it's not a major concern. Usually, using a little more lube will prevent additional rust, and riding will cause the chain to wear away the rust while you're pedaling.


In certain gears, pedaling cause loud skipping

There may be debris between the cogs. If you can see mud, grass, leaves, twigs, or any sort of foreign matter trapped between cogs, dig it out. It's probably keeping the chain from settling all the way down onto the cog to achieve a proper mesh. If there's no debris, a cog is probably worn out. Most often this is a sign that the chain and cassette will have to be replaced.

Front derailleur won't shift precisely to a chainring

Check that the cage is parallel to the chainrings (when viewed from above), and loosen and reposition the derailleur if necessary. If it's parallel, you probably need to adjust the high- and low-limit screws, best done by a shop or experienced amateur mechanic.

The rear derailleur makes a constant squeaking noise

The pulleys are dry and need lubrication. Drip some light lube on the sides, then wipe off the excess.

Braking feels mushy, even though the pads aren't worn out

The cable probably stretched. Dial out the brake-adjuster barrel (found either on the caliper or on the housing closer to the lever) by turning it counterclockwise until the pads are close enough to the rim to make the braking action feel as tight as you want.

Braking feels grabby

You probably have a ding or dent in the rim. This hits the pad every revolution, causing the unnerving situation. Bring your bike into Bumstead's. We'll fix it for you.

One pad drags against the rim or stays significantly closer to the rim than the other

Before messing with the brakes, open the quick-release on the wheel, recenter the wheel in the frame and see if that fixes the problem. (This is the most common solution.) If the wheel is centered but a pad still rubs, you need to recenter the brake. On most modern brakesets this is done by turning a small adjustment screw found somewhere on the side or top of the caliper. (There may be one screw on each side, as well.) Turn the screw or screws in small increments, watching to see how this affects the pad position. If you center the brake and the wheel, and a pad still drags on the rim, it probably wore unevenly from being misadjusted; sand the pads flat and recenter everything. 

With each pedal stroke you hear a click coming from the saddle

The pedal may have loosened. Tighten it.

Squealing Brakes

Wipe the rim to remove any oil or cleaning reside. If this doesn't work, scuff the pads with sandpaper or a file. Still noisy? The pads need to be loosened, then toed in; an adjustment that makes the front portion touch the rim before the back- an easy fix for a shop, a tortuous process for a first timer.

Creaking Saddle

Dip a tiny amount of oil around the rails where they enter the saddle, and into the clamp where it grips the rails. Heritage purists take note: Leather saddles sometimes creak the same way that fine leather shoes can. There's not much you can do about this.

You can never remember which way to turn the pedals

Treat the right-side pedal normally — righty-tighty, lefty-loosey. The left side pedal has reverse threads (to keep it from unscrewing during pedaling). If that's confusing, just remember this simple phrase: Back off. This can remind you that, with the wrench engaged above the pedal, you ALWAYS turn toward the back of the bike to remove the pedal. 

You installed a pedal into the wrong crankarm - The left pedal into the right arm or vice versa

You can remove the pedal, but the crankarm will have to be replaced; its threads are softer than the pedal's and are now stripped out. ALWAYS check the pedals before installing. There is usually an R for right or an L for left stamped onto the axle. 

You pulled apart your headset to regrease it, and now the headset feels tight no matter how you adjust it

The bearing retainers are probably in upside down.


Come to Bumsteads for all your bike maintenance needs.
We are located at 1038 W. 4th St. in Ontario, CA. You can reach us by phone at (909) 984-9067

Wednesday, April 24, 2013

2014 Shimano XTR M980 Group is Jaw-Droppingly Light


Shimano's Lightest Ever Disc Brakes Are Still Powerful and Reliable

The Carbon Tubular 29er wheels and improved hubs and Bottom Bracket are pretty much icing on the cake.


Continuing the Shimano XTR legacy as the industry's original premium cross-country racing mountain bike component group, Shimano introduced a new lightweight XTR component and wheel additions that elevate the performance for elite cross country racers. For 2014, Shimano XTR M980 series will see the addition of new lighter weight hydraulic disc components, new drivetrain components including a lighter bottom bracket and more durable chain, as well as ultra-lightweight carbon tubular 29" mountain bike wheels.

The Shimano XTR M980 group is the first mountain bike component range to have two separate complete groups (race and trail). There's the rider tuned concept that allows riders to mix and match drivetrains, brake systems, wheels and pedals for the way they ride. Shimano introduces new XTR Race products specifically designed to reduce weight, increase efficiency and provide a winning edge for the world's best cross country racers.

CARBON WHEELS
Designed for and proven at World Cup and Olympic cross country mountain bike competitions, the new limited edition XTR WH-M980 carbon tubular 29" wheels set a new industry benchmark for carbon 29" wheel performance. Strongly supporting 29er geometry, Shimano is only offering the XTR WH-M980 is a 29er version.  While tubular wheels may be expensive and difficult to deal with, they offer real world tangible benefits. The way they climb, accelerate, and corner are noticeably different from traditional wheels. With no bead, the tire profile becomes more round which really changes how the tire handles. Featuring a super light weight full-carbon offset rim that tips the scales at an anorexic 290 grams and 29 spokes laced to a quick engagement freehub body for perfect traction, these wheels give away nothing. WH-M980 wheels will be offered exclusively with Shimano's splined Center Lock rotor mounting for easy and quick installation.
LIGHTEST EVER SHIMANO HYDRAULIC DISC BRAKE SYSTEM
Shimano debuts its lightest hydraulic disc brake system ever to the XTR line. Shimano concentrates on 3 things with their brake development: power, stiffness, and heat dispersion.
Shimano uses an internal power level rating system and the new XTR maintains the Shimano tradition of powerful yet manageable brake engagement. Maintaining stiffness is a key component of modulation. The new XTR has a magnesium caliper, magnesium master cylinder, and a carbon fiber brake lever. (A first for shimano!) These are lightweight, high performance brakes.


ICE TECHNOLOGIES ADVANCEMENTS FOR CROSS COUNTRY
For heat requirements, Shimano uses their ICE technology of making a rotor that has 3 layers with the center layer being aluminum to draw heat. The new finned section comes from technology developed in the SAINT line of products. So now a 160mm rotor draws/disperses as much heat as a 180mm rotor used to. The new XTR brake also has a high powered hose, two piece caliper construction, banjo bolt that flows oil and keeps the two pieces together. The SM-RT99 reduces heat by an additional 40 degrees.
The XTR hubs have been improved this year as well, with improved seals, a titanium freehub body, and QR or thru axle options. The XTR press fit bottom bracket is lighter and works better than last year. Stronger sealing and less rotational drag are a few more improvements to the the XTR system.


Come to Bumsteads for all your road bike needs.
We are located at 1038 W. 4th St. in Ontario, CA. You can reach us by phone at (909) 984-9067

Monday, April 22, 2013

2013 Trek CrossRip Elite - Best All-Around Bike Under $1000

The CrossRip is a chugger, not a tight and twitchy ride.

 If you're looking for a disc-equipped, cyclocross-inspired do-it-all-bike, look no further than the 2013 Trek Crossrip. It's a great option as an "all-arounder" and works great as a commuter. 


It starts with Trek's Alpha 100 Aluminum frame, and the Crossrip is nicely built and finished. The carbon-bladed, alloy steerer fork is cyclocross length so that lifts the front of the bike over what you'd expect from a road fit. The resulting position is comfort-oriented; with the stem pointing down so you can flip for an even higher front. 

You can generally tell whether a company things a CX bike will actually be used for CX by looking at the gearing and tires. On the CrossRip, you find a road compact chainset (FSA Vero) and wide cassette, and Bontrager 32mm hardcase touring tires. Other touches mark this out as more of a town bike, for example the security-conscious skewers that open with an allen key, and the urban camo paint job.

(FSA Vero Crank pictured right)

So this disc-equipped commu-tourer is a bike for a bit of everything. It's very capable on the tarmac and it's perfect for unsurfaced paths too, as the beefy Bontrager tires can shed off flints and thorns easily. Another nice feature of the CrossRip Elite is the traditional bend drop bar, which some people find to be more comfortable than the ergonomic bends on the market.


The brakes are really, really good. They are Hayes CX5 mechanical discs that work superbly: lots of power and great modulation. This control and reliability makes downhilling lots of fun. This bike is good at speed, stable and reassuring with it's direct steering. 


(internal routing pictured right)


Shifting-wise, Shimano's Sora is massively better than it's previous incarnation. There's one more ratio, but the real change is from thumbshift to proper Dual Control with the downshift behind the brake lever. Much easier to use from multiple position and lighter too. The Sora's STI shifters create a nice and flat hand area and feel comfortable on the hands. They have a smooth action when shifting and pulling the brake lever. 

In the rear there is an 11-32 cassette coupled with a 50/34 compact up front. The CrossRip also comes with rack and low rider mounts too. Bontrager's Racelite IsoZone Handlebar is comfortable in all positions and the SSR stem is quite stiff.


Come to Bumsteads for 
all your road bike needs.
We are located at 1038 W. 4th St. in Ontario, CA. You can reach us by phone at (909) 984-9067

Friday, April 19, 2013

SRAM Unveils 2 New 11-Speed Groupsets


Brand New 2013 Groupsets From SRAM. Red 22 and Force 22 

Upgrading to 11-speeds (True 22) and using hydraulic brakes (disc and rim), all the while continuing to provide quality components in the rest of the departments, including AeroGlide and Yaw Technologies.

SRAM has released two new groupsets, the Red 22 and the Force 22.


Let's start with the
SRAM Red 22

It's nice to see SRAM moving two groupsets, Red and Force, to 11-speed. But why have they decided to call them True 22?


With a double chainset and 11-speed cassette you clearly get 22 different gearing options, and SRAM says you can run the chain in the large chainring and the largest sprocket, and in the small chainring at the smallest sprocket. They don't necessarily advocate cross chaining, but it can be done.


Continuing the Yaw Technology first introduced on their last Red groupset frees you from the need to trim the front mech when moving across the cassette to avoid chainrub.


It's also worth noting that the shifters, mechs, chainsette and cassette are not compatible with 10-speed components, although Red and Force 22 components can be used interchangeably.


So how are the components?


The shift levers are the same weight as the previous model (280g) and continue to use the proprietary

Double Tap system where shifting in both directions is controlled by a paddle that sits behind the brake lever.


The rear mech also has the same weight (145g) and look from the previous design, and all of the technology from before has been carried over including the AeroGlide Pulleys designed to dampen sound, and the ceramic pulley bearings. (You can run an 11-32 tooth sprocket with SRAM's WiFLi rear mech, but it will cost you an extra 21g)


While the front mech looks similar to before, it has been modified to work as part of the True 22 system. The cage rotates slightly when you move it across so that it stays inline with the chain. This eliminates the need to adjust the front mech when you move the chain across the cassette.


SRAM points out that this front merch isn't compatible with a 10-speed system.


The chainsets (available in 53/39-tooth, 50/34, 46/36 and 52/36 in GXP, PressFit, PF30, and BB30) offer the same key features of the existing Red chainset, including Exogram cranks with hollow carbon
arms and spider.

Caliper cable operated brakes haven't been redesigned, but are still fantastic. Aerolink arms provide impressive power and there is enough clearance for use with wider wheels.


Moving on to the
SRAM Force 22

We only really need mention that the front derailleur uses Yaw Technology modified to work with an 11-speed system. The mech is compatible with both clamp (31.8mm and 34.9mm) and braze-on designs. Comes with the chain spotter also to stop you from overshifting inwards and damaging your frame. Considerably ligher than last year's the Force front merch weighs in at just 79g.


The rear derailleur also comes in two versions, short cage, and medium length compatible with WiFLi cassettes.
Now on to what you really want to know about.

Hydraulic Brakes on a Road Bike...?

As has been speculated widely over recent months, SRAM is introducing hydraulic braking as an option with these new groupsets - both disc brakes and rim brakes. They're also offering these braking options to users of 10-speed systems.

SRAM has loads of experience in hydraulic braking through their Avid brand, but rather than adapting current mountain bike braking system to the road market, they have completely redesigned things completely with road-specific calipers and piston ratios.

The HRR (Hydraulic Road Rim) brakes can be fitted to standard road frames and forks in the place of
normal mechanical brakes without the need for any special mount points.

The HRD (Hydraulic Road Disc) brakes require a disc-specific frame and forks and hubs that will take the rotor. The HRD system provides more braking power than the HRR system, and it's far less affected by wet weather. Plus with the brakes working on a steel rotor rather than on the carbon or aluminum rim, no heat is transferred to the tire or the tube.

The new SRAM Red components, including hydraulic brakes, should be available mid to late July. The S-Series 10-speed hydraulic brakes will be available at the same time.

The new SRAM Force components will be shipped about a month later.


Come to Bumsteads for 
all your road bike needs.
We are located at 1038 W. 4th St. in Ontario, CA. You can reach us by phone at (909) 984-9067


Wednesday, April 17, 2013

SRAM Puts Hydraulic Rim and Disc Brakes On Their Brand New 2013 Road Groupset


images courtesy of www.road.cc

Hydraulic Brakes... On A Road Bike?!

A few months ago, SRAM confirmed rumors that they have new designs for road hydraulic brakes, one operating on the wheel rim and one disc version. 


Why have SRAM decided to introduce hydraulic systems for the road? They made sure to emphasize these three points in a press conference last week: power, control, and modulation.

Mat Brett with www.road.cc was able to sit down with SRAM's project manager Paul Kantor who further explains the desicion making behind the new designs.

Kantor begins by describing the ideas that went into the new design. He says that SRAM liked the concept of putting disc brakes on road bikes but weren't sure of it's benefits or draw-backs.

The guys at SRAM built a hydraulic coupler into a stem [to standard mechanical levers], put it on a steel cyclocross frame and experimented. While the hydraulic brakes lived up to SRAM's expectations, but the design was unnattractive and bulky. Their solution: make it fully integrated.

Later in the interview, Mat poses another question: If hydraulic rim brakes feel so powerful for such little effort at the lever, why would people want to go for disc brakes on the road? Kantor responds with a compelling argument: "Our hydraulic disc brake has a higher braking force at every lever force than a mechanical brake on an aluminum or a carbon rim, and more than our hydraulic rim brake. You can provide quite a bit more force for less hand effort and that's really what we like about most hydraulics. 

We think that Red mechanical and Shimano Dura-Ace mechanical brakes are pretty comparable, but with a hydraulic rim brake you are able to exceed that braking performance. On a disc brake we can create eve more force for the same lever effort. It's much more consistent wet and dry too because we are braking on a steel rotor that's consistent time and time again. That's where discs come into their own.

CEN (The European Committee for Standardization) requires that there's not more than a 20% drop off between wet and dry on a rim brake and we improve that substantially on a disc brake. It's more like a drop of 5-8% in bad conditions. Plus, it's a sealed system that's consistent over time.

You can run a rim brake engaged at about 550W for 6 minutes and you'll burst the tyre. [...] You can run a disc brake at 900W for 11 minutes and the brake doesn't boil and the tyre doesn't burst.

Once you start adding up all these testing elements you start to see more and more opportunity for a disc brake to exceed what's already out there."


You might be asking yourself: Why not just go for discs, then? 

Mat replies to that also, saying that SRAM really likes the way rim brakes ride, and that they're all about choice. They want to put many good options out there to allow the customer to make the choice. 

He says hydraulic rim brakes may eventually win out over hydraulic ones, but he doesn't think so. 

When can you afford one? Mat predicts that hydraulic disc brakes will come down in price over the next 4 years to a 105/Rival price point. He says at that point they will have to decide to either: make a fancy mechanical disc brake or see if they can push the hydraulic technology down further. 

SRAM will be selling the rotors separately. They recommend a 140mm rotor for off-road and 160mm for higher speeds on the road.

The weight is 449g per wheel (including lever, caliper, hose, and 160mm HSX rotor). The HHR caliper brake uses forged aluminum arms and a SwissSTop pad compound, and weighs in at 387g per wheel- lever, caliper, and 600mm of housing. 
The new SRAM components should be available from May to June. 

SRAM sponsored pro teams will be keen for the teams to use the hydraulic brakes, although it will be the rim version as UCI regulations don't permit discs.

Stay tuned to the blog, we will be talking more about the SRAM Red 22 (and Force 22) groupset.

Come to Bumsteads for 
all your road bike needs.
We are located at 1038 W. 4th St. in Ontario, CA. You can reach us by phone at (909) 984-9067

Friday, April 12, 2013

2013 WSD Trek Skye SL Disc. Powerful Brakes, Plush Suspension, Lightweight Frame and Much More


2013 Trek (WSD) Skye SL Is Perfect For Fierce Trails

www.bumsteadbikes.com


If you are a woman and you LOVE to go mountain biking, the 2013 Trek Skye SL Disc is definitely the bike for you. It’s fun, versatile, and designed to fit you right from the start. You will be confident riding this bike on or off the road, knowing that the bike is capable of handling any trail you can find. Trek uses high-performance aluminum with manipulated tube shapes to balance strength and weight. That means the frame is stiff, maneuverable, and light.


  • Frame: WSD Alpha Gold Aluminum w/semi-integrated head tube, formed down tube w/integrated gusset, formed top tube, monostay seatstay, forged dropouts w/rack fender mounts, replaceable derailleur hanger
  • Front Suspension: SR Suntour XCM w/30mm stanchions, coil spring & preload, hydraulic lockout, WSD Rider Right spring weight, 100mm travel (14": 80mm travel)
  • Brakeset: Tektro Women's Draco hydraulic disc brakes w/160mm rotors, adjustable-reach levers


If you are interested in mountain biking, this is definitely a bike worth checking out. You can see it at Bumstead's Bicycles. We'll let you take it for a spin because we know you will love it. We are located at 1034 W. 4th St. in Ontario, California. 909-984-9067 www.bumsteadbikes.com

Want a MTB but not a Skye? Here are some reviews of Trek's other 2013 bikes:
Lexa SL
FX 7.2

Wednesday, April 10, 2013

2013 Trek Stache 29er Is More Ready For The Trails Than You!


Trek’s Stache is designed for "trail riding," as the marketers are wont to say. 

How convenient, I like to ride trails! The 120mm-travel Stache measures in with a 68.6 degree head angle, 17.52-inch long chainstays, and a 12.4-inch high bottom bracket. There's nothing shocking about those numbers. They represent a logical extension of Trek's 29er hardtail geometry, adjusted for an additional 20mm of fork travel, compared to the company’s XC hardtails.

The frame on the all-new-for-2013 Stache was designed from the ground up. The large hydroformed main tubes, tapered head tube, 142x12mm thru-axle rear, and press-fit bottom bracket let you know that Trek built the Stache to be strong and stiff. Other highlights include ISCG tabs, dropper post routing, sloping top tube, and plenty of tire clearance


Here's another video from www.bikemag.com

Monday, April 8, 2013

NEW VIDEO - HELP! I Need A New Mountain Bike, Which One Should I Get?

How Can I Know Which Mountain Bike is Right for Me?


In this video, Lloyd helps explain the differences between each step up in price and components for all the different MTBs out there. 

Thursday, April 4, 2013

The 2013 Trek Dual Sport Series Are The Best Multi-Use Bikes

Everyone knows Trek is a world leader in mountain bike technology. 

They produce some of the most technologically advanced mountain bikes on the market. 


Each platform is a leader in its class and is loaded with features and details that will make any ride, on any trail, better. Take the Dual Sport for example.  A nimble hybrid with suspension, extra tread, and a moderate position for people who want the freedom to ride everywhere. If you can only have one bike, you want to get a dual sport. Sure, they get you from point A to point B faster than most other bikes, but there is so much more to this line!
SO much more, that it's hard to believe that these Gary Fisher collection bikes start at such a low price, with the quality they provide. There is such attention payed to detail like: the color-matched fork and ferruels on the cables.  They ride smooth, and help you find your love for adventure. Fast on the road to get you where you need to go: work, school, or other, yet has capable suspension and offers a confident ride on trails. 
Take your inner mountain biker out once in a while, with massive tire clearance on this bike you will be able to use tires as big as XDX 29"x1.8" MTB tires (without fenders). This light, strong frame is rack and fender ready, and is plenty equipped to do some weekend warrior trail riding! It's clear that hydroforming isn't just for show and the frame is stiffer and lighter for it. 


Trek begins the lineup with the 8.1 DS. Alpha Gold Aluminum, using manipulated tube shapes to balance strength and weight saving. 21 Speeds and easily accomodates 700x35c tires with fenders or up to an XDX 29"1.8" MTB tires without fenders. The 8.1 and all other Dual Sport bikes also come Bontrager saddles and bars to ensure complete comfort no matter how long you ride.


The 8.2 DS receives a shock-absorbing suspension fork that allows the front wheel to travel up and down over bumps while the handlebars stay steady, for a comfortable, controlled ride.


Now we start moving into the big leagues with the 8.3. It comes with a nice upgrade to a Shimano Acera crank and rear derailleur, and is also outfitted with mechanical disc brakes. It's SR Suntour NEX MLO front fork is preload adjustable with lockout and has 63 mm of travel. You can expect this fork to deliver smooth riding and nimble handling over even the most potholed roads and bumpiest paths..


The next step is the 8.4 and which means you get an upgraded Alivio crank, Shimano Deore rear derailleur, and Bontrager Satellite Elite ergonomic grips. You jump up to 27 speeds on this model, ensuring you always have the right gear on the road.


The 8.5 is doing a great job as the second best bike in this lineup, boasting a fantastic Shimano SLX rear derailleur and Shimano hydraulic disc brakes that provide ultimate control and stopping power.


All hail the 2013 Trek 8.6 DS. It is the ultimate two-in-one bike. Trek's proprietary IsoZone frame gives suspension that is built in to the frame. Your suspension lockout is remote controlled by a lever on the handlebar, making the 8.6 one of the best of the Gary Fisher Collection.

Read More About The 8.6 Here!


Return to the simple joy of cycling with a go-anywhere, fast, lightweight hybrid bike from Trek. Commute on it, ride it on the road, ride it on bike paths, no matter where you ride, you'll have fun! Take the long way home.

Come Check Out these Awesome Bikes at Bumstead's Bicycles! We are located at 1038 W. 4th St. in Ontario, CA. You can also give us a call at (909) 984-9067

Tuesday, April 2, 2013

Why Get A Bike Fitting? Top 5 Reasons


Do You Need A Fitting? 

Here are the Top 5 Reasons You Should at Least Check


Riding with high comfort and efficiency requires a properly fitted bike. There is a lot of misinformation floating about, saying that none of your weight should be on your arms, or that saddle height doesn't matter, or the handlebars should be as high as the seat, but this information comes from well-researched books and studies by experts.

TOP 5 REASONS TO GET A FITTING


1. Riding your bike shouldn't hurt.

If it hurt for you to walk or run, you would see a Physical Therapist to find out why. Why should riding a bike be any different? If riding your bike hurts, you need precision adjustments to your position and equipment to stop the pain and keep you on your bike.


2. Prevent Repetitive Motion Injury

Biking is repetitive in nature. During a bike fit, alignment and position are optimized, which greatly enhances your riding enjoyment


3. Be More Effective

The goal in a fitting is to mate the bike with your body to help you enjoy riding comfortably and efficiently. A fitting will help you put more power to the pedals and stay balanced easier when riding.


4. Enhance Safety and Handling

If you aren't in the right position when riding, it can make it extremely difficult to reach your shifters or brake hoods, your water bottle, or your pedals. By sitting correctly on the bike, you can easily reach and maneuver all these necessary parts of your bike.


5. Improve Overall Endurance and Efficiency

The bike position is not inherently natural. Your muscles have to learn how to be efficient on the bike. When your bike fit is dialed in, your body is happier. A fit can optimize your muscular ergonomics and train neuromuscular skill of cycling biomechanics.


Everyone is different, and these recommendations only represent the norms, these are the best estimates from experts who have done experiments involving hundreds of people (and assembled by http://www.bicyclesource.com/bike/fitting). The information listed here is not intended for you to be your own fit specialist, but to give you an idea of what goes into the process.


Crank Length:

The right crank length, boils down to body size and rider style. Longer cranks have more leverage and can push large gears at a low cadence in climbing and time trialing. Riders who sprint or have a high cadence will do better with standard crank sizes. For general road racing and touring, frames smaller than 21" (54 cm) will want a 170mm crank. 21.5"-24" (55 to 51cm) will probably want cranks of 170 to 172.5mm. Those with frames over 24.5" (typically over 6'2") tend to want cranks of 172.5 to 175mm.
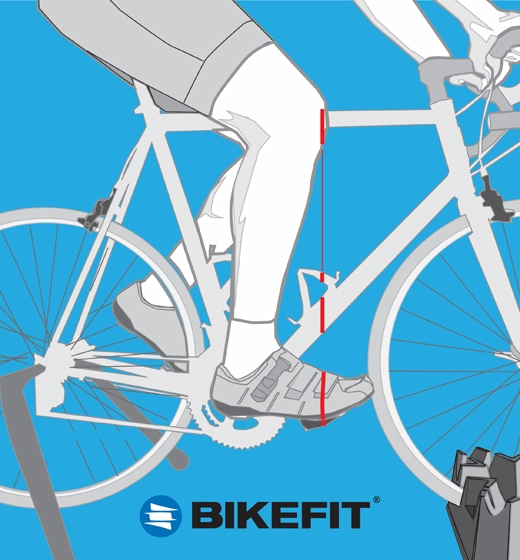


Cleat Adjustment:

If the ball of your foot is not over the pedal spindle, or the leg is forced into an unnatural twist, you not only compromise performance, but also risk knee injury! Here is how you adjust your cleats:

1. Grease the clean bolts and tighten moderately

2. Mount the bike, click (or strap) in

3. Adjust the position so that the ball of your foot is either directly above or slightly behind the pedal axle.


Keep in mind that cleats positioned too far forward on the shoe will generate excessive ankle movement, and can cause an Achilles strain.

Continue to make small adjustments on your pedals until you have found the spot that feels just right


Saddle Tilt:

Sometimes cyclists tilt their saddles very slightly upwards, which helps the rider put more weight on the saddle and less on the arms. Sometimes cyclist tilt their saddles downward which causes the rider to constantly slide forward or brace themselves with their arms as long as they're in the saddle. Forward-tilted saddles do not add to comfort, so set it to dead level.


Saddle Height & Position:

Perhaps one of the most important aspects of getting your fitting is the positioning of your saddle. It's important that you are not sitting too tall on the bike, as this will cause over extension in the knee. If you are sitting too low on the bike, you will lose a ton of power at the pedals and your ride will feel much more laborious.


Moving your saddle back puts you in a lower posture, which is more aerodynamically efficient, allows you to use all of your leg muscles, and is better for your back and breathing. The farther forward you are, the more total power output you have available, and farther back allows you to "ankle" more effectively and is conducive to long-haul output.


While you may be able to find the perfect saddle position on your own,  it is much better to receive a professional fitting to find that "sweet spot" for the best combination of comfort and efficiency.


Handlebars:

While it is normal to have some of your weight resting on your arms, you need to be sure that the majority of your weight isn't resting there. Straight bars (on hybrid bikes), often nearly as high or higher than seat can limit your riding so severely that it hardly matters where you put your weight.

On the better designed mountain bikes, you note that the handlebars are very much lower than the seat, and are far enough forward to promote optimal 45 degree back posture.


Lowering your bars gives you more power, as jerking on your bars as you pedal will add to the torque generated, without the unwanted side effect of pulling the front wheel off the ground. The lower, more distant handlebars also let you move your saddle forward with respect to the pedals, which puts it in a sprinty position.


Handlebar position:

Handlebar position is generally set by the nose being directly above the handlebars when down on the hooks. The second rule of thumb is when riding in your normal position, your front hub should appear hidden by or a bit behind your handlebars. Alternately, sit on the bike in your normal riding position while someone holds it steady. Without changing your position, remove one hand from the bars and let it relax and dangle freely. WIthout stretching, rotate your arm in a large arc. As it comes back to the bar, if it comes ahead or behind your other hand, your handlebars need to be moved.


The rotation of your bars is determined solely by what is comfortable, not the bar's alignment with the earth's surface. Rotate your bars upward until you achieve a more neutral wrist position.  Let comfort be your guide to fine tune this as your body will guide you to the best position. This simple adjustment will help improve hand comfort and reduce numbness.


(A)Symmetrical legs:

For almost everyone, you'll find that one leg is longer than the other. If the difference is as slight as a half centimeter, you probably needn't worry, but at some point you'll want to make your bike fit.


If the difference is mostly in your thighs, you'll want to compensate your crank length. IF your lower legs are different, the pedal cage height is the measurement to change. Shimano makes drop-center pedals, which can be fitted to some cranksets

. The shorter leg uses a conventional pedal, possibly using an adapter in the crankset. Another option is to use orthopedic pedals set to different cage heights.


Bike Frame Sizing:

Primarily regarding road bikes (but we'll make notes about mountain bikes when appropriate, think of the bike frame along two dimensions: vertical and horizontal. The best frame size for a cyclist is as small vertically as possible, with enough length horizontally to allow a stretched out, relaxed upper body. This frame will be lighter and stiffer than a larger one and will handle better and be more comfortable than a smaller frame.


Frame size is measures from the seat lug at the top of the center of the bottom bracket. To calculate your correct frame size, divide your height by three, or subtract 9 inches from your inseam length (measured from crotch to floor in bare feet)


Regardless of the calculations, the frame should be easily straddled with both feet flat, perhaps with an inch of clearance. While a smaller frame can be compensated with a higher seat and headset (of course), a frame which is too large for adequate groin clearance should be avoided at all costs. If you can adjust the seat and bars properly with two different sized frames, the smaller one will be stiffer and absorb less of your pedaling power through flexing. As men have proportionately shorter legs than women, your frame and seat will usually be higher than a man of the same height.


For a mountain bike, we start by recommending a frame in the rance of 10-12 cm. smaller than you take in a road frame.

In many ways, though, it is more important to fit a mountain frame by the top tube length needed, rather than by the seat tube length. For instance, you might be able to get to the proper frame clearance, saddle height and neutral knee position on either a 17" or 19" frame. Yet the 19" frame will likely have a top tube that is 1" longer than the 17" frame, which changes your stem length accordingly. Or, one manufacturers 17" frame may give you a 22" top tube, while the next one's 17" gives you a 22.8"


If you are serious enough to wear clip in pedals, you may want to consider getting a professional fitting. Riding your bike should be something you do to escape the daily grind, or, for many of you, training for your next race. You may not be training for a specific goal, but who doesn't want to be more comfortable and efficient on their bike?


Keep in mind if you are getting a bike fit on your own bike, and you are not looking for a new bike, it is OK to make sure the bike fit is done on your bike. It isn't mandatory that you start your fit on another bike or sizing type bike to then transfer everything back to your bike.


If you find your comfort on the bike changes after you've left the fitting session, you need to go back to the fitter and let them know. An issue can still creep up down the metaphorical or literal road. But, if you are experiencing pain or discomfort let the fitter know right away. Getting to the fitter quickly helps ensure that they refit you for little or no cost, and helps the fitter as your fit will be fresher in their memory.


Summary:

 This overview is not intended to take the place of an actual bike fit done by a bicycle fitting specialist. While using this guidance will help you fit yourself nothing beats a good bike fit from a well-trained and experienced fitter. If you want to get a bike fit hopefully this overview will help you better determine the right person for the job by enabling you to ask better quesitons.